If you have ever taught yourself OpenGL, you probably remember the pain of pulling in a whole pile of libraries. GLEW and GLUT in particular are awkward to use. SFML makes opening a window very simple, and for anyone learning OpenGL, I think it can completely replace GLUT. So in this post I will use SFML to create the window, then write a casual OpenGL example: a simple forward renderer using the Phong model.
The project is here.
Before We Start
Before hand-writing any OpenGL code, there are usually three basic problems we need to solve.
- How do I open a window? Without a third-party library, you first have to use the Windows API yourself, which is very troublesome, especially because you need to manually handle Windows window events and build a complete input mechanism. With third-party libraries, there are options like glfw and glut, but these older libraries are not pleasant to use. This time we will use SFML. SFML (sfml-dev.org) is an open-source windowing library based on modern C++. It is written entirely with post-C++11 syntax, and one of its selling points is better modern C++ support.
- How do I get the OpenGL functions? Because of Microsoft’s own motives, the core-profile OpenGL functions are implemented, but they are not exposed to you directly, so we have to fetch them ourselves. You can use glew or glad for this. glad has a better overall user experience, so we will use glad to get all the OpenGL functions.
- How do I do the math? The best-known math library for OpenGL is glm, although Eigen or others also work. glm and Eigen are both header-only libraries, and their matrices are column-major, so there is not much difference in day-to-day use. This time we will use glm.
Bringing in Libraries and Basic Environment Setup
Glad
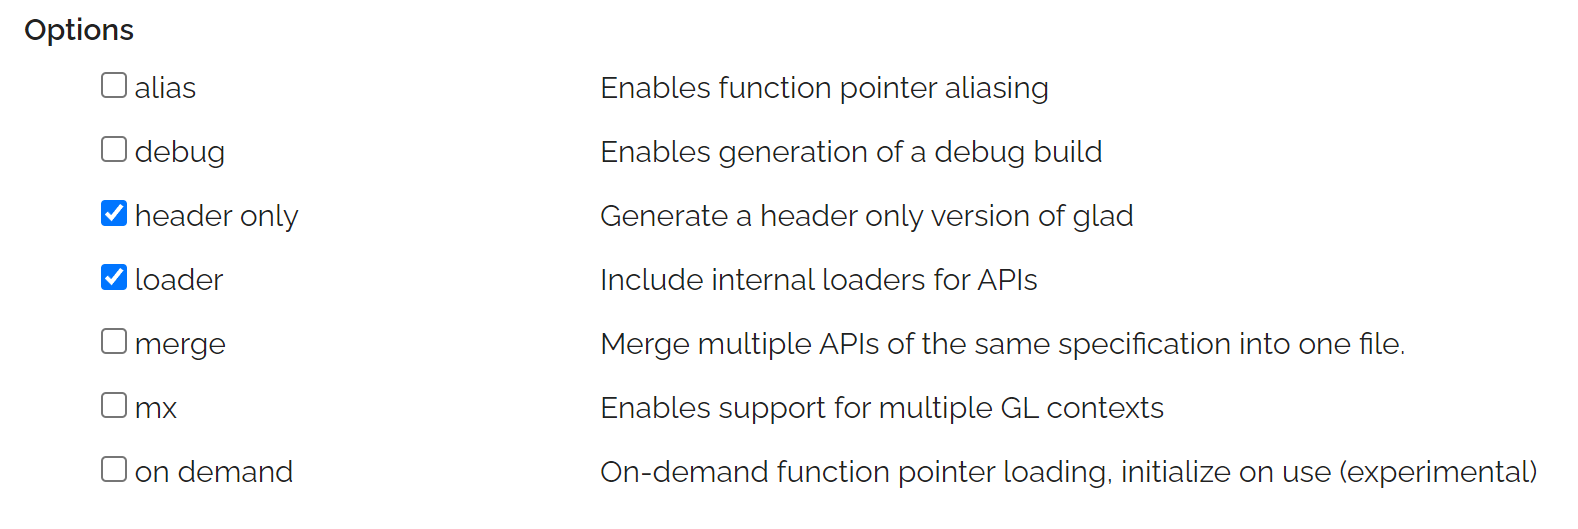
Get Glad here. It is very simple to bring into the project as source code. Note that in this example, we choose the header-only version of Glad with the built-in Loader.
- For the header-only version of Glad, we need to create a cpp file ourselves to compile the corresponding implementation. So create one separate cpp file and write the following content in it:
#define GLAD_GL_IMPLEMENTATION
#include <glad/gl.h>
- Glad with its own Loader is easier to load. You do not need to prepare a function pointer receiver yourself; one line is enough.
::gladLoaderLoadGL();
GLM
Get Glm here. It is also header-only and very easy to bring into the project.
SFML
The official website provides precompiled binaries for direct download. You can also download the source and build it yourself. If you download directly from the official site, it provides both dll dynamic libraries and lib static libraries. Here we use static linking.
Each downloaded lib has several versions.
| Name | Meaning |
|---|---|
| sfml-xxx.lib | Import library for dynamic linking, Release version |
| sfml-xxx-d.lib | Import library for dynamic linking, Debug version |
| sfml-xxx-s.lib | Static library, Release version |
| sfml-xxx-s-d.lib | Static library, Debug version |
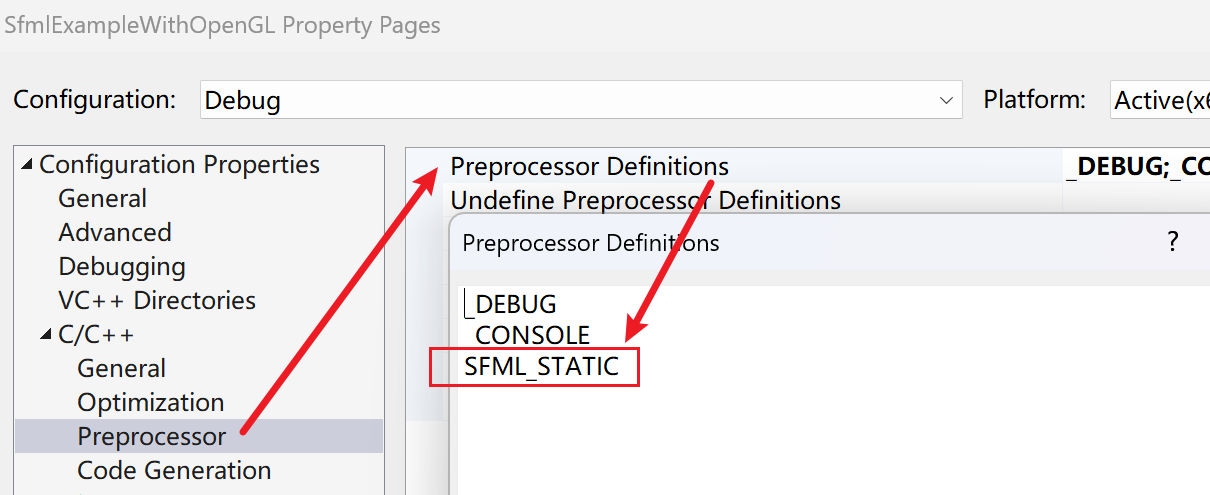
Since we use static linking, we only need the latter two for each library. Also, when using static linking, we need to define one extra macro: SFML_STATIC.
Visual Studio Configuration
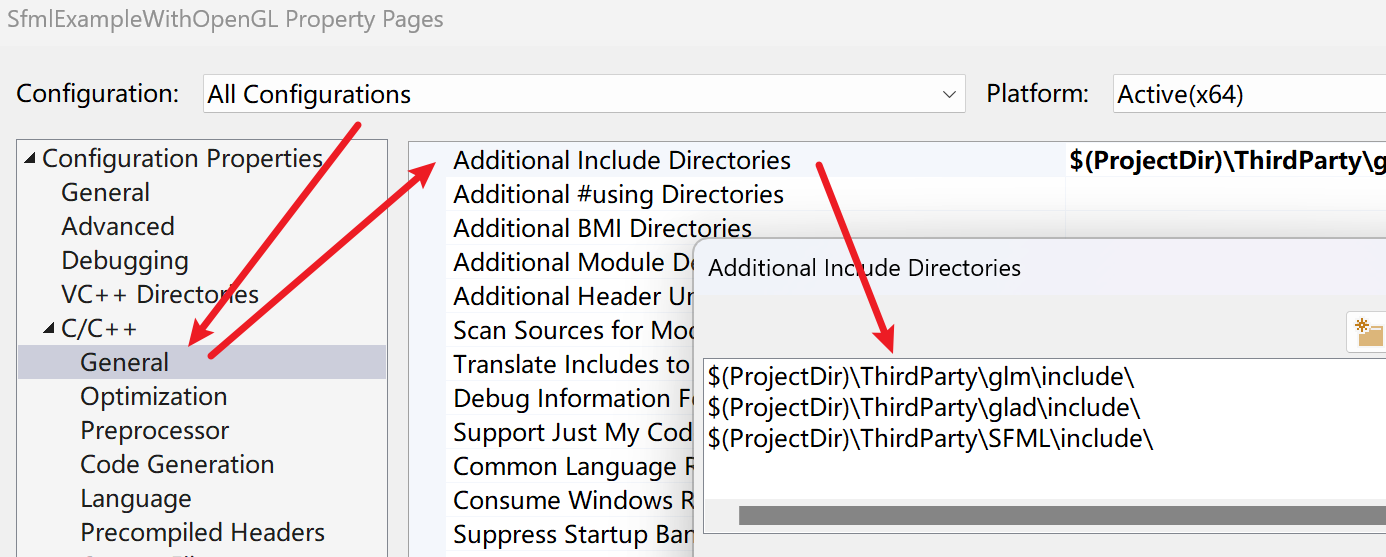
First, the include directories.
Then the static library directories.

Then the specific static libraries. Note that Debug and Release must be separated: the libraries without d and the libraries with d.

SFML static libraries depend on each other, and the exact dependencies can be found in the official tutorial. In short, this application needs the three SFML libraries window, graphics, and system, plus the three system libraries opengl32, winmm, and gdi32. The system libs may already be linked by default, but listing them explicitly here does not hurt.
For macro configuration, using SFML with static linking requires the SFML_STATIC macro. This is needed for both Debug and Release.
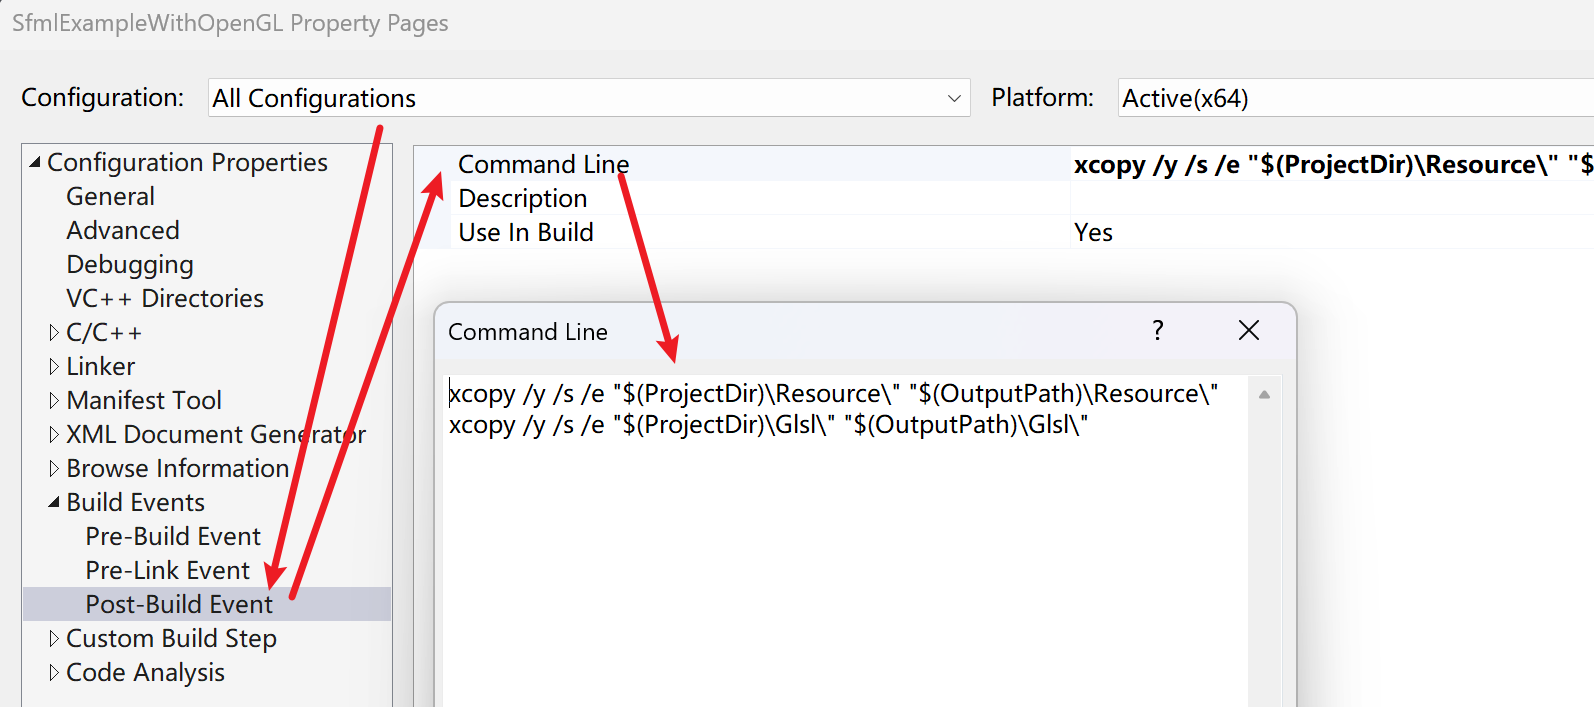
Finally, there is one post-build configuration. The following example needs textures and glsl files. The program uses relative paths to read images and glsl files, so after building, we need to copy all resources in the project to the target exe directory.
Getting Started
The logic for opening a window with SFML is very simple:
// Create the context settings for a window.
sf::ContextSettings contextSettings;
contextSettings.depthBits = 24;

// Create a window.
 sf::Window window(sf::VideoMode(640, 480), "TestTest", sf::Style::Default, contextSettings);

// Activate the window.
 window.setActive();

// Main window loop.
while (window.isOpen())
{
    // Window events.
    sf::Event event;
    while (window.pollEvent(event))
    {
        // do something
    }

    //...

    // Refresh the display.
    window.display();
}
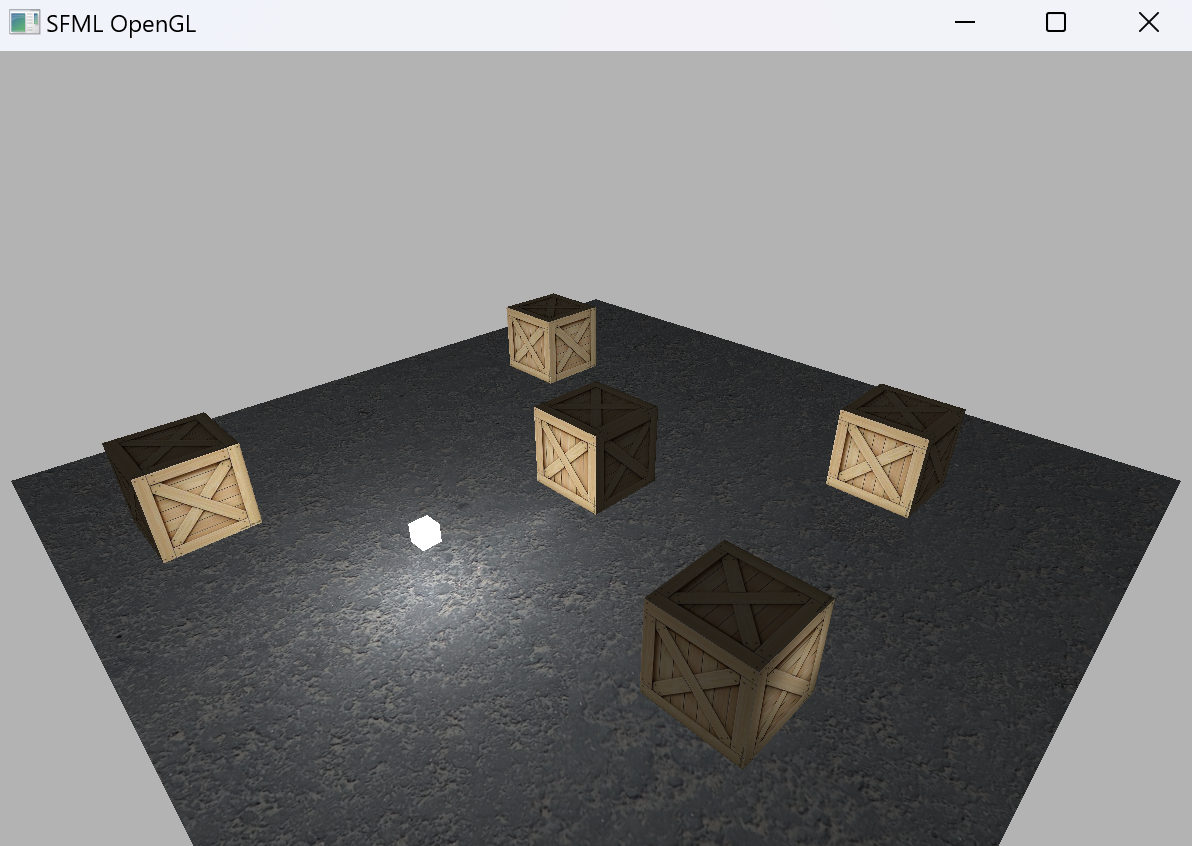
After that, we only need to insert the normal OpenGL logic into it. In the program below, we will implement a simple effect like this.
The OpenGL part starts to get verbose, so we need a few simple abstractions: vertex data, textures, materials, Shader, and Object.
Vertex Data
For simplicity, we will not load a model. We will just provide the data directly: one set of vertex data for a plane and one for a cube.
inline std::array<float, 48> gPlaneVertices =
{
    // positions(model position)  // normals         // uv
    5.0f, 0.0f,  5.0f,           0.0f, 1.0f, 0.0f,  1.0f, 0.0f,
   -5.0f, 0.0f,  5.0f,           0.0f, 1.0f, 0.0f,  0.0f, 0.0f,
   -5.0f, 0.0f, -5.0f,           0.0f, 1.0f, 0.0f,  0.0f, 1.0f,
    /* Omitted because it is too long. */
};

inline std::array<float, 288> gCubeVertices=
{
    // positions          // normals           // uv
    -0.5f, -0.5f, -0.5f,  0.0f,  0.0f, -1.0f,  0.0f,  0.0f,
     0.5f, -0.5f, -0.5f,  0.0f,  0.0f, -1.0f,  1.0f,  0.0f,
     0.5f,  0.5f, -0.5f,  0.0f,  0.0f, -1.0f,  1.0f,  1.0f,
	/* Omitted because it is too long. */
};
Create the vao and vbo related to each model’s vertices together, and store them together. For simplicity, we will not use an ebo. While creating the vbo and vao, we also set the corresponding vertex attributes. Here the vertex format is hard-coded as position + normal + uv.
struct VertexData
{
    unsigned int vbo;
    unsigned int vao;
    unsigned int triangleNum;

    VertexData(unsigned int dataSizeInBytes, float* data)
    {
	    /* [VBO] Create vertex buffer */
	    ::glGenBuffers(1, &vbo);
	    ::glBindBuffer(GL_ARRAY_BUFFER, vbo);
	    ::glBufferData(GL_ARRAY_BUFFER, dataSizeInBytes, data, GL_STATIC_DRAW);

	    /* [VAO] Generate vertex array for plane and bind it */
	    ::glGenVertexArrays(1, &vao);
	    ::glBindVertexArray(vao);

	    /* Layout */
	    ::glEnableVertexAttribArray(0);
	    ::glEnableVertexAttribArray(1);
	    ::glEnableVertexAttribArray(2);
	    ::glVertexAttribPointer(0, 3, GL_FLOAT, GL_FALSE, 8 * sizeof(GLfloat), (GLvoid*)0);
	    ::glVertexAttribPointer(1, 3, GL_FLOAT, GL_FALSE, 8 * sizeof(GLfloat), (GLvoid*)(3 * sizeof(GLfloat)));
	    ::glVertexAttribPointer(2, 2, GL_FLOAT, GL_FALSE, 8 * sizeof(GLfloat), (GLvoid*)(6 * sizeof(GLfloat)));

	    triangleNum = dataSizeInBytes / 8;
	}

    ~VertexData(); { /* destroy vso & vbo */ }
};
Textures
class Texture
{
public:
	Texture(const std::string& path, int slot);
	~Texture();

public:
	int GetSlot() const;

private:
	unsigned int _handle;
	int _slot;
};
Here slot marks the texture unit for this Texture, meaning the value we will later pass to the corresponding uniform in the Shader. The slots for all textures only need to avoid conflicts with each other. The maximum number of supported textures depends on the graphics card and can be queried with glGetIntegerv, using the enum GL_MAX_COMBINED_TEXTURE_IMAGE_UNITS.
The core of this class is reading and creating the texture in the constructor. Since SFML already has an API for reading textures, we do not need to introduce stb_image like many typical OpenGL examples do.
/* Create texture handle and active it's slot */
::glGenTextures(1, &_handle);
::glActiveTexture(GL_TEXTURE0 + slot);
::glBindTexture(GL_TEXTURE_2D, _handle);

::glTexParameteri(GL_TEXTURE_2D, GL_TEXTURE_WRAP_S, GL_REPEAT);
::glTexParameteri(GL_TEXTURE_2D, GL_TEXTURE_WRAP_T, GL_REPEAT);
::glTexParameteri(GL_TEXTURE_2D, GL_TEXTURE_MIN_FILTER, GL_LINEAR);
::glTexParameteri(GL_TEXTURE_2D, GL_TEXTURE_MAG_FILTER, GL_LINEAR);

/* Load image */
sf::Image image;
image.loadFromFile(path);
image.flipVertically();

int width = image.getSize().x;
int height = image.getSize().y;
const unsigned char* data = image.getPixelsPtr();

if (data)
{
	/* Pass data from CPU to GPU */
	::glTexImage2D(GL_TEXTURE_2D, 0, GL_RGBA, width, height, 0, GL_RGBA, GL_UNSIGNED_BYTE, data);
	::glGenerateMipmap(GL_TEXTURE_2D);
}
Shader
class Shader
{
public:
	Shader(const std::string& vertexPath, const std::string& fragmentPath);
	~Shader();

	unsigned int GetHandle() const;

	void SetUniformBool(const std::string& name, bool value) const;
	void SetUniformInt(const std::string& name, int value) const;
	void SetUniformFloat(const std::string& name, float value) const;
	void SetUniformMat4(const std::string& name, glm::mat4 mat) const;
	void SetUniformVec3(const std::string& name, glm::vec3 vec) const;
	void SetUniformVec3(const std::string& name, float x, float y, float z) const;

private:
	unsigned int _programHandle;
	std::vector<unsigned int> _shaderHandles;
};
The core of this class is creating the Shader for each stage and linking them into one Shader program.
// Compile the Shader.
unsigned int shaderHandle = ::glCreateShader(shaderType);
::glShaderSource(shaderHandle, 1, &shaderSource, nullptr);
::glCompileShader(shaderHandle);

// Link the Shader.
_programHandle = ::glCreateProgram();
::glAttachShader(_programHandle, vertexShader);
::glAttachShader(_programHandle, pixelShader);
::glLinkProgram(_programHandle);
Material
For PBR rendering, the material system is a huge and complex topic. For this simple Phong model example, we just provide a metallic value and a roughness value as a rough representation.
struct Material
{
	float roughness;
	float metallic;
};
In the Shader, roughness is multiplied into the diffuse term, and metallic is multiplied into the specular term.
Object
An Object in a scene is defined as a collection of the render state plus its world-space position, rotation, and scale.
class Object
{
public:
	explicit Object(const VertexData*, const Texture*, const Shader*, const Material*);
	virtual ~Object() = default;

protected:
	// World state
	glm::vec3 _position;
	glm::quat _rotation;
	glm::vec3 _scale;

	// Render context
	const VertexData* _pVertexData;
	const Texture* pMainTexture = nullptr;
	const Shader* pShader = nullptr;
	const Material* pMaterial = nullptr;
}
Render state should really be discussed per Pass. For a simple forward renderer, there is only one render Pass, so the Object definition above is enough. But in a complex render pipeline, there will be many render Passes, and one object may participate in one or more of them. In each Pass, that object often uses a different Shader, material, and texture, while the vertex data is usually the same. So in a complex render pipeline, an Object should store multiple sets of render state.
enum class RenderPass
{
	ShadowPass,
	ForwardPass,
	GeomertyPass,
	LightPass,
	// ...
};

struct PassRenderPara
{
	const Texture* pMainTexture = nullptr;
	const Shader* pShader = nullptr;
	const Material* pMaterial = nullptr;
};

class Object
{
	// ...
public:
	template<RenderPass Pass>
	auto SetRenderPassPara(const Shader* pShader, const Texture* pMainTexture = nullptr, const Material* pMaterial = nullptr) -> void
	{
		_passRenderParaMap[Pass].pShader = pShader;
		_passRenderParaMap[Pass].pMainTexture = pMainTexture;
		_passRenderParaMap[Pass].pMaterial = pMaterial;
	}

protected:
	const VertexData* _pVertexData;
	std::unordered_map<RenderPass, PassRenderPara> _passRenderParaMap;
}
When the same object is rendered in different Passes, it uses different render states. To show this flow, this example defines two Passes. The first Pass is standard forward rendering, drawing five cubes and one plane. The second Pass is the light Pass, which also uses the cube model, shrinks it a bit, and draws it as a point light.
Render Loop
Next we assemble the whole rendering process. First we need to create the various Objects in the scene. In this example, five cubes and one plane are lit, while the separate point light is unlit. We use two arrays to store the Objects drawn by each Pass.
// For forward pass
std::vector<Object> lightShadingOpaqueObjects;
// For light pass
std::vector<Object> unlitShadingOpaqueObjects;
The code for assembling these Objects is a bit long, so I will not include it here. Below is the render loop directly. The comments make each step fairly clear.
while (window.isOpen())
{
    /* Window event loop */
    sf::Event event;
    bool shouldBreakLoop = false;
    while (window.pollEvent(event))
    {
        if (event.type == sf::Event::Closed)
        {
            window.close();
            shouldBreakLoop = true;
        }
    }

    if (shouldBreakLoop)
        break;

    /* Clear the screen */
    ::glClear(GL_COLOR_BUFFER_BIT | GL_DEPTH_BUFFER_BIT);

    /* Prepare VP */
    glm::mat4 view = camera.GetViewMatrix();
    glm::mat4 projection = glm::perspective(glm::radians(FOV), static_cast<float>(WIDTH) / HEIGHT, 0.1f, 100.0f);

    /* Draw light shading objects */
    for (auto& renderObject : lightShadingOpaqueObjects)
    {
        auto& renderPara = renderObject.GetRenderPassPara<RenderPass::ForwardPass>();
        if (renderPara.pShader == nullptr)
            continue;

        // 1. Bind vertex attribute
        ::glBindVertexArray(renderObject.GetVertexData()->vao);

        // 2. Bind vertex array
        ::glBindBuffer(GL_ARRAY_BUFFER, renderObject.GetVertexData()->vbo);

        // 3. Bind shader program
        ::glUseProgram(renderPara.pShader->GetHandle());

        // 4. Upload uniforms
        renderPara.pShader->SetUniformMat4("model", renderObject.GetModelMatrix());
        renderPara.pShader->SetUniformMat4("view", view);
        renderPara.pShader->SetUniformMat4("projection", projection);
        renderPara.pShader->SetUniformInt("tex", renderPara.pMainTexture->GetSlot());

        renderPara.pShader->SetUniformVec3("light.color", glm::vec3{ 1.0f, 1.0f, 1.0f });
        renderPara.pShader->SetUniformVec3("light.position", gSingleLightPosition);
        renderPara.pShader->SetUniformFloat("material.roughness", renderPara.pMaterial->roughness);
        renderPara.pShader->SetUniformFloat("material.matellic", renderPara.pMaterial->metallic);

        // 5. Draw call
        ::glDrawArrays(GL_TRIANGLES, 0, renderObject.GetVertexData()->triangleNum);
    }

    /* Draw unlit shading objects */
    for (auto& renderObject : unlitShadingOpaqueObjects)
    {
        auto& renderPara = renderObject.GetRenderPassPara<RenderPass::LightPass>();
        if (renderPara.pShader == nullptr)
            continue;

        // 1. Bind vertex attribute
        ::glBindVertexArray(renderObject.GetVertexData()->vao);

        // 2. Bind vertex array
        ::glBindBuffer(GL_ARRAY_BUFFER, renderObject.GetVertexData()->vbo);

        // 3. Bind shader program
        ::glUseProgram(renderPara.pShader->GetHandle());

        // 4. Upload uniforms
        renderPara.pShader->SetUniformMat4("model", renderObject.GetModelMatrix());
        renderPara.pShader->SetUniformMat4("view", view);
        renderPara.pShader->SetUniformMat4("projection", projection);

        // 5. Draw call
        ::glDrawArrays(GL_TRIANGLES, 0, renderObject.GetVertexData()->triangleNum);
    }

    /* Swap back buffer */
    window.display();
}